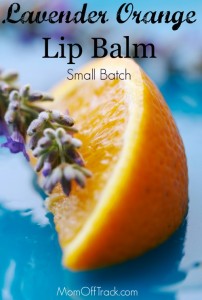
It's been the week of DIY Essential Oils around here! First I made the bath salts, next I posted about the sugar scrub and today, it's all about the lip balm. Last winter my friend Jennifer from Threaded Together came over with some amazing Peppermint Lip Balm she had made. The stuff was awesome. Then in the summer she made Strawberry Lemonade Lip Balm which was incredible. I am hijacking off her recipe here and want to make sure she gets full inspirational credit. I have been wanting to try this for awhile with essential oils and finally the perfect combo came to me-Lavender Orange Lip Balm. It turned out great. Here are the directions to make your own! This will make 12 filled tubes. But with the beeswax bag you buy you could make 100's. Lavender Orange Lip Balm Ingredients: Coconut Oil Beeswax 1 Vitamin E capsule (optional) 12 Lip Balm Tubes Glass Pipette I used plastic this time because I was being lazy and the hot oil melted the first one. Buy glass. Young Living Orange Essential Oil Young Living Lavender Essential Oil (Save $25 on the new Young Living Premium Starter Kit) Washi Tape if you plan to decorate them after. Directions: Melt ...
Search Results for: lip balm
Super Simple Lip Scrub | Quick and Easy Beauty DIY
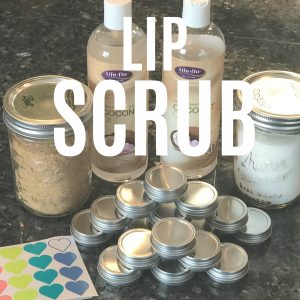
A few weeks ago I hosted a fabulous "Make and Take" Essential Oils party with some of my friends and we made up this super simple lip scrub for everyone to take home. Towards the end of Summer/beginning of Fall my lips are always a little dry and chapped. Enter this super simple, customizable lip scrub to help gently exfoliate the dry skin on my lips, making it easier to apply lip balms and the occasional lipstick smoothly. It's so easy that all of the 5 year old girls there made one for themselves! DIY LIP SCRUB INGREDIENTS List contains affiliate links! Sugar-Raw or Granulated-up to you. I personally like the Raw for better exfoliation. Fractionated Coconut Oil Screw Top Tins Young Living Essential Oils-try Lavender, Peppermint, any of the Citrus ones, or your other favorite Vitality oil (careful if you have broken skin) DIY LIP SCRUB DIRECTIONS Fill tin container 2/3 full of the sugar of your choice. Add coconut oil to just cover the top of your sugar. Stir with a tooth pick. Cover and decorate lid. We just used heart stickers this time. That's it. Told you it was super simple! ...
DIY Candy Corn Soap

I'm all for anything that gets people washing their hands more this time of year! This DIY Candy Corn Soap is a lot of fun to make and it looks and smells great! I originally came up with the recipe with my niece and she loved it--so this is definitely mom tested, kid approved! The good news is that if you have made any of my other DIY soap projects, you probably have most of the items on hand to make this today. If not, click on the Amazon (affiliate links) to get them ordered quickly. Here is what you will need: DIY Candy Corn Soap Ingredients Soap Colorant Olive Oil Soap Base Goats Milk Base silicone soap mold Young Living Essential Oils- for this I used a combination of Stress Away, Nutmeg and Cinnamon Bark (so that it had a Snickerdoodle scent) but you could do this just as easily with Thieves (like in this How To Make Soap For Kids tutorial) DIY Candy Corn Soap Instructions: You need to make this soap in 3 stages (for each of the colored layers) and plan time in between for each layer to cool. The actually time to make the project is about 25 minutes but add your drying time into that when planning. This recipe will yield two bars. Please ...
How To Take Pinteresting Photos

I'm often asked (and very flattered) when people ask me what equipment I am using to take my DIY shots. The truth is, I don't use anything fancy at all. Just some simple techniques I have learned throughout the years and my trusty Samsung Note 3 phone. Yup, that's right...I don't even own a "real" camera. Here are some Pinterest photo tips to get you started. Pinterest Photo Tip #1: Know Your Home Which windows get the most natural light? At what time of day. I have two places I take shots, in my living room on the floor in the afternoon under a wall of windows or in the kitchen next to the sink window in the morning. Anywhere else casts too many shadows or won't let me see the details on things like oil bottle labels. To test it, take some small objects like oil bottles or even green army men and shoot around your house. You will start to see how the shadows play at different times in natural light. Don't be afraid to get down on the floor...as you will see shortly, no one will ever know. Pinterest Photo Tip #2: It's All About the Props I am constantly on the lookout for Pinteresting Props. I stalk the Target $1 spot which is full of great things like Chevron contact paper, ...